A self-guided medina walking route
Is there a good self-guided walking route through the Marrakech medina?
Yes. A loop starting at Jemaa el-Fna, heading north through the souks to Ben Youssef Madrasa, then south past the Bahia Palace and Saadian Tombs before returning to the square, covers the medina's main sights in roughly 3.5 to 4.5 hours of walking and stopping, without needing a guide or a car.
The Marrakech medina rewards walking more than any guided minibus circuit, but the tangle of unnamed derbs defeats most visitors within the first half hour. This route solves that with a fixed loop, roughly 4km of walking including detours, linking the medina’s main sights in a logical order without doubling back more than necessary.
It’s designed to be done alone with a phone map as backup, though the individual landmarks are close enough together, and well-known enough to locals, that you can always ask your way to the next one if you drift off course.
| Where | Loop starting and ending at Jemaa el-Fna |
| Cost | Free to walk; entry fees for palaces and the madrasa run roughly 100 MAD (€9) each |
| Time needed | 3.5–4.5 hours including stops, longer with a lunch break |
| Getting there | Start at Jemaa el-Fna, reachable on foot from most medina riads |
| Best time | Start by 8:30–9am to beat both the heat and the crowds at each site |
The route, stop by stop
Start at Jemaa el-Fna and head north into Souk Semmarine, the medina’s main covered artery. Walk without a fixed destination for the first fifteen minutes — this is the densest, most photogenic stretch of the souks, and getting a feel for it before you have somewhere specific to be sets up the rest of the walk. For a fuller sense of what’s sold where in this stretch, the Marrakech souks guide is worth reading beforehand.
There’s no single correct path through this first stretch, which is part of the point — the covered lanes fork constantly, and two people starting at the same gate rarely take the same route to the far end. Use the gaps in the wooden roofing as a rough compass rather than trying to memorise turns: light filtering through generally means you’re near a junction or a square, which is a useful moment to pause and get your bearings before pressing on. If you lose the thread entirely, any stallholder will point you back toward Jemaa el-Fna or onward toward Ben Youssef; both names are universally recognised even by shopkeepers who share no other language with you.
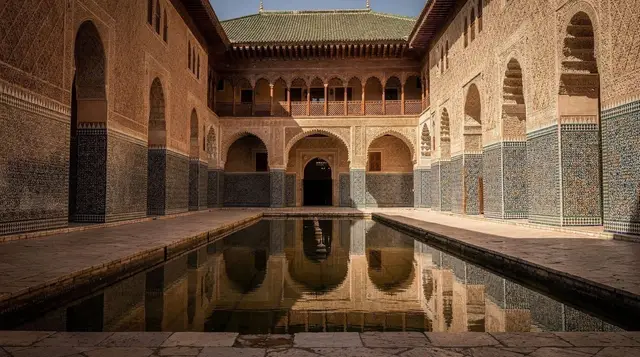
From Souk Semmarine, bear east toward Rahba Kedima and then north again to reach Ben Youssef Madrasa, roughly 20 minutes of walking with stops. This restored 16th-century Quranic school is one of the medina’s genuine architectural highlights — carved cedar, zellige tilework, and a central courtyard that’s worth 30–45 minutes on its own. Full detail is in the Ben Youssef Madrasa guide. The Marrakech Museum sits directly opposite if you want to extend this stop; see the Marrakech museums guide for whether it’s worth the detour.
The second half: south to the palaces
From Ben Youssef, retrace south through the souks toward the Kasbah quarter, about 25–30 minutes of walking, aiming for the Bahia Palace. This is the route’s longest single stretch and the best place to break for lunch if you’re doing the full loop in one go — several rooftop cafés along the way serve tagines and salads in the 60–100 MAD range.
The Bahia Palace itself deserves 45–60 minutes; its courtyards and painted ceilings are the most consistently impressive stop on the route, covered fully in the Bahia Palace guide. From there it’s a five-minute walk to the Saadian Tombs, a smaller but equally striking site that’s best visited without lingering too long given the narrow access point that tends to bottleneck. Loop back west from the tombs through the Kasbah mosque area and rejoin Jemaa el-Fna from the south, completing the circuit.
This final stretch back toward the square passes through some of the quieter residential lanes on the whole route, a useful contrast after the density of the souks and the queues at the palace gates. It’s a reasonable point to slow down deliberately rather than push straight through — a mint tea at one of the small local cafés along the way, away from the square’s tourist-facing terraces, tends to cost a fraction of the rooftop spots and gives a more ordinary sense of medina life than either the souks or the monuments provide on their own.
Reading the medina as you walk
The medina is easier to follow once you stop treating it as a maze and start treating it as a set of layers. The wide, busy arteries carry most of the foot traffic and the commerce; the narrower lanes that branch off them are quieter, more residential and often more rewarding. On this route you will move between the two constantly, and noticing the shift in sound, light and pace is half the pleasure. If the medina district overview is new to you, a quick read beforehand makes the street names on your phone map feel less abstract.
Pay attention to what changes underfoot and overhead too. Covered sections tend to be cooler and more enclosed, with stalls grouped by trade, while open stretches feel brighter and more exposed. Craft areas often announce themselves by sound before sight: hammering, scraping, the clatter of a workshop. These are good cues that you are passing through a working quarter rather than a purely tourist-facing one, and they are worth slowing down for. The artisan workshops guide explains what you are likely to hear and see, and how to step inside a workshop politely if curiosity gets the better of you.
Starting well at Jemaa el-Fna
How you begin sets the tone for the whole loop. The square changes character through the day, and an early start means you see it in its quieter, working mode before the crowds and the performers arrive. Take a minute to orient yourself before you plunge into the souks: note where the Koutoubia minaret sits relative to you, since it is a useful landmark for the end of the walk, and identify the entrance to the main covered lane so you are not hesitating at the mouth of it. The Jemaa el-Fna guide covers how the square is laid out and what to expect at different hours.
It also helps to decide in advance how you will handle approaches from people offering directions, guiding services or help finding a site. A polite, firm decline while you keep walking works better than stopping to explain. Most encounters are harmless, but unsolicited guiding can turn into an awkward request for payment. For a fuller picture of what to expect and how to respond calmly, see the scams guide and the safety guide.
Shopping and bargaining along the way
You will pass hundreds of stalls, and it is tempting to buy the first thing that catches your eye. A better approach on a walking loop is to browse without committing, note what you liked and where, and decide on the way back or on a second pass. Carrying purchases around for four hours is tiring, and by the time you reach the palaces you will have a clearer sense of what is a fair price and what you actually want. If you do decide to buy, the haggling guide explains the rhythm of a negotiation, and the shopping guide helps you decide what is worth buying in the first place.
Remember that browsing is not an obligation. You can admire a lamp, a rug or a leather bag, thank the seller and move on. Keeping your tone friendly and unhurried tends to make exchanges more pleasant on both sides, and it keeps your energy for the sights the loop is really built around.
Food and drink stops
A medina walk is easier to enjoy when you eat and drink at sensible moments rather than waiting until you are exhausted. The midpoint, around the Kasbah quarter, is the natural place for a proper sit-down meal, but you can also graze on smaller snacks closer to the square. If you want to eat from stalls rather than at a café, the Jemaa el-Fna food stalls guide and the street food safety guide will help you choose well and avoid an upset stomach. For a broader view of what to order across the city, the Marrakech food guide is the place to start.
A glass of mint tea is the classic pause. The mint tea guide explains the ritual and why it is offered, which makes the stop feel less like a transaction and more like part of the walk.
Making the route your own
The loop is a framework, not a script. If a side lane looks interesting, take it; the landmarks are close enough that you can always find your way back to the main line. If you are travelling with a particular interest, bend the route around it: spend longer in the madrasa if architecture is your thing, linger in craft quarters if you like workshops, or shorten the palace stops if you would rather sit in a café. A first-time visitor to the city may want to pair this loop with the broader advice in the first-time visitor guide, while anyone deciding between exploring alone and paying for company can weigh the trade-offs in guided tour or independent.
For those with a little more time in the city, the walk slots neatly into a wider plan. The two-day itinerary places a medina loop alongside other highlights, and the three-day itinerary gives it more breathing room. Whichever plan you follow, treat this walk as your orientation: once you have done it, the rest of the medina becomes far less intimidating.
Shortening or extending the route
Not every visit needs the full loop. If you’ve only got a morning, doing just the first half — Jemaa el-Fna to Ben Youssef and back through a different stretch of souks — covers the densest, most photogenic part of the medina in under two hours and skips the entry fees entirely. Conversely, if you’ve already walked this route once, a second pass with a private walking tour tailored to your specific interests — architecture, photography, food — can go deeper into side streets and courtyards that a self-guided first pass understandably misses.
Travellers based in Gueliz rather than the medina itself can still do the full loop, but should budget an extra twenty to thirty minutes each way for the taxi to and from Jemaa el-Fna, and should factor that into the overall timing rather than trying to compress the walking portion to compensate.
Timing and pacing
Doing the whole loop before midday avoids both the worst heat and the worst crowds at Bahia and the Saadian Tombs, which get significantly busier by early afternoon as day-trip groups arrive. If a full 4-hour walk in one go feels like too much, the route splits cleanly at Ben Youssef: do the souks-and-madrasa half one morning, the palaces half another, with a rest or lunch in between.
Water and sun protection matter more than the modest distance suggests — most of the walk is in direct sun once you’re outside the covered souk sections, and shade is inconsistent around the palace quarter. A hat and a bottle of water bought from any medina shop (5–10 MAD) covers this easily.
Before and after the walk
If you’re staying in the medina itself, the route conveniently starts and ends near most riad clusters; see staying in a riad for what a medina base is actually like. For visitors based further out in Gueliz, factor in a taxi to and from Jemaa el-Fna, covered in Medina or Gueliz: where to base yourself. Once you’ve done this loop, the Koutoubia Mosque guide covers the medina’s other unmissable landmark, a short walk south of the square and easily added to a return visit.
A few practical notes make the walk itself smoother regardless of pace or start time. Phone signal inside the medina’s covered souk sections is patchy at best, so screenshot or note the route’s key names — Souk Semmarine, Ben Youssef, Bahia Palace — rather than relying on live navigation throughout. Small change matters more than it sounds: entry fees at both the madrasa and the palace move faster with close-to-exact notes rather than large bills that need breaking. And comfortable, closed shoes genuinely change how the second half of the route feels, since the cobbles between Ben Youssef and the Kasbah quarter are uneven in places that don’t show up in photos.
Most visitors who do this walk end up repeating some version of it later in the trip, usually a shorter loop through just the souks once the palaces have already been ticked off. That’s a reasonable way to use the route a second time — as a mental map for casual wandering rather than a fixed itinerary to follow again start to finish.
Medina and souk tours on GetYourGuide
Verified deep-linked GetYourGuide tours. Book through these links and we earn a small commission at no cost to you.
Photo: our own image of the location, not the operator’s product photo.